First thing to do was install Arduino-0022 (I already have 1.0.5 installed but the arduino-extras was written for pre-1.0 versions, didn’t want to go through the pain of updating the code and mess it up for sure) and replace the arduino folder with the content of arduino-extras.zip. Also, in Preferences, I unckecked “Check for updates on startup” because I want to keep this Arduino version as it is - newer versions will apply to my other Arduino-1.0.5 install.
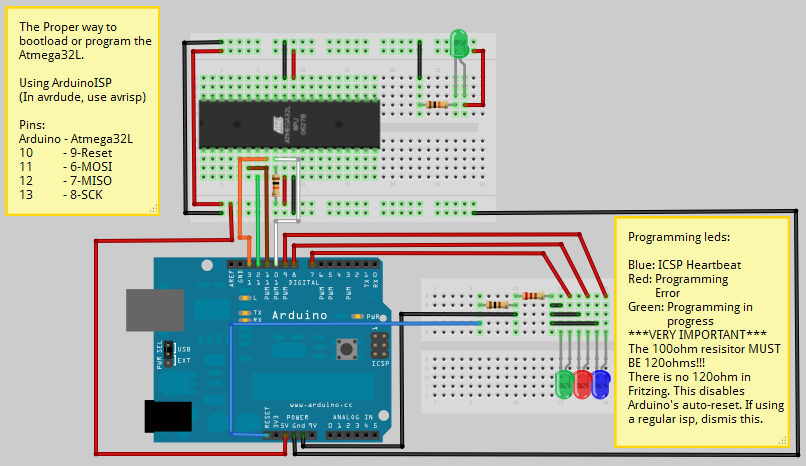
Most important step is wiring the Atmega32 to the Arduino: I have an ISP programmer somewhere but using an Arduino instead seemed to be easier for someone like me. The schematic is shown here and is great!I wired everything as in the image but since I didn't have a 120 ohm resistor, I decided to use a close one instead, 150 ohm. It says clearly in the image that the resistor MUST be 120 ohm but my limited experience said: if 120 ohm can do the job, why not a 150 ohm! Big mistake that cost me quite some time! (Now I know I should listen to my betters and not assume anything, especially since I am just a noob in electronics.) Running the first command in the document:
avrdude -p m32 -c arduino -P /dev/ttyUSB0 -b 19200I got instead of the expected response:
avrdude: Device signature = 0x1e9502this:
avrdude: Device signature = 0x1e9406

avrdude: Expected signature for ATMEGA644P is 1E 96 0A

Double check chip, or use -F to override this check.
I googled around and found the same exact message in this post which in turn links to this doc in Arduino playground where it is explained with details that the resistor must indeed be 120 ohm! I dug into my box of resistors in the end found a few that connected together yielded the desired 120 ohm. I reran the previous command again and this time I got the expected reply. Awesome!
Note: there is a difference between the original schematic I followed and the last article I mentioned: in the original one, the 120 ohm resistor is between RESET and GND; in this article is between RESET and 5V. I assume they both worked but I decided to go with RESET to 5V.
The commands are listed and detailed in the post I mentioned above, in a nutshell what I did to burn the bootloader was:
- Check everything is ok
- Set the chip to be unlocked, and use the internal 8mhz oscillator
- Unlock to bootloader
- Flash the arduino bootloader
- Lock the bootloader.
Again, big thanks to hexskrew for figuring this out!
No comments:
Post a Comment