Friday, September 26, 2014

Project follow-up: Raspberry Pi with 433 MHz radios, mqtt and node-red

Now that my Arduino sensors to Raspberry Pi using 433 MHz radios project is done and I learned a lot about posting to the web and using a db, it was time to learn something new; mqtt is a very hot topic in the IoT world so this was my next target. Using an MQTT broker like mosquitto is not only cool but allows for decoupling of the different parts; for example, instead of writing a monolithic piece of code that does everything (read sensors, post to the web, save to a database, like in my previous project) and which needs a lot of work in order to add some new functionality, one could write a piece of code that for example, only reads sensors and publishes to an MQTT topic; then another piece of code can subscribe to that topic, get the sensor values and post them to the web; and yet another piece can subscribe to the same topic, get the values and save them to a database. And so on, the possibilities are endless and different parts of the system are independent and can be plugged in and out very easily. And since it is very easy to install mosquitto on a Raspberry Pi, I decided to go ahead.

To integrate mqtt in my C code I used mosquitto client library (libmosquitto) with some docs here: not a lot of help for a beginner but I found plenty of articles and example code. I ran into a lot of issues because the library that I installed was older and none of the example code worked; Roger (mosquitto's author) was kind enough to point me to a page explaining how to install the latest library so I installed libmosquitto-dev from this repo and it solved my problems. I also needed to add -lmosquitto to the Makefile.

After this code was done (if you are interested you can find it here), I had to decide what is the next piece so I decided on node-red: a chance for me to dig deeper into this cool technology and add to my experience from my previous projects. As Simen Sommerfeldt so eloquently makes the case in this great article, node-red is perfect as the "glue" between different pieces of code. To start with I decided to create a flow that reads sensor motion data from the MQTT broker and plays a sound via a python script. I already had a script but Simen's was much better so I used his - big thanks goes to him for sharing his work. The node-red flow was done in minutes; I then added 2 exec nodes to start the C code reading sensor data and the python script. As a side note, at this time I am running this exec nodes manually instead of starting them automatically when the flow starts, until I can figure out how to prevent multiple instance from running at the same time. This project is by no means as cool as Simen's moving skull but I will use as my Halloween project to play some random scary sounds when trick-or-treaters come to the door.

While I was working on this project I got an email from the great folks at dweet.io and freeboard about some great features they added recently. When I saw their email I decided to add another branch to my flow to get the sensors data and post it to dweet.io. Node-red is so awesome that I had all this done in a matter of minutes: I found a dweetio node-red node, installed it, added the nodes to post to dweet, and I also had a quick freechart done. The node-red flow is also in my github repo.
By the way, if you haven't yet, you really need to try dweet.io and freeboard: really awesome services with a free tier - big thanks to the guys at Bug Labs that are behind these services.

Friday, September 19, 2014

Arduino sensors to Raspberry Pi using 433 MHz radios

Finally getting to wrap up my first end-to-end project using Arduino and Raspberry Pi talking via inexpensive 433 MHz radios - the distance over which they work is pretty small but this instructables explains how to add an antenna which dramatically improved the distance. The main idea was to have multiple Arduinos with TX radios, each equipped with DHT and PIR sensors; they all send the data to the Raspberry Pi which posts it to the web and also writes it to a local database. In addition to the values from sensors, I am also sending the voltage level, hoping that this way I can monitor the discharge of the batteries (I am not sure if this works or not, I didn't use an analog pin for this, I am simply getting the voltage on the MCU, using code from this great instructables).

The code for both the sender (Arduino) and the receiver (Raspberry Pi) is in my github repo. The comments in the code pretty much explain everything (how it works, how to connect the sensors and radios, and so on). Here are just some quick ideas that may be interesting.
  • I wanted to transmit all the data in one go so I combined 4 numbers into one long, as described in both sender and receiver code.
  • The transmission between the radios is pretty flaky, that's why I am repeating the send a lot on the Arduino and there is code on the receiver to ignore identical values coming in a 30s interval. This is OK because transmissions from different stations have different station codes so even if the sensor values are the same, the actual overall value is different. Same for a motion sensor: the ON value is different than the OFF value so even if they happen a second apart, both will be received.
  • I started by posting the data to SparkFun's data service, then added Dweet.io and in the end settled on ThingSpeak and I'm also saving all the data to a local SQLite database. See some notes about this later in this post.
  • The code in github is ready to use: just change the stationCode for each Arduino station and use the right API keys in the Raspberry Pi code.
Notes about posting to the web: there are a lot of great IoT services out there with free tiers, to start with I chose the few mentioned above that have a simple API and that accept GET. Each free service has certain rate limits so I need to consider the data volume I will be posting. With one station only getting the temperature sensor data every 3 minutes, this means 5 posts in 15 min. The motion data is a bit more intensive, roughly 2 posts 5 sec apart (ON and OFF) every time the motion sensor is triggered which at the most (sensor triggered all the time) means 24 posts a minute. Because there is potentially a lot more motion data, I am using 2 different data streams (channels, feeds): one for temperature, humidity and voltage and one for motion; even so with a lot of stations there is the risk of missing data (according to each service rate limits as described below) so I decided to also implement a local SQLite database to store the data and eventually process it later and post it (maybe using node-red).

Rate limits:
  1. SparkFun's data service is limited to making 100 log requests every 15 minutes. Given the 5 posts in 15 min, the temperature data stream can accommodate 20 stations without losing data which is more than I need. The motion data though may accommodate only 1 or 2 stations (more if there is not a lot of activity around them) without starting to lose data. I will post all the data I can, the remainder being lost.
  2. Dweet.io holds on to the last 500 dweets over a 24 hour period so while there won't be data loss, the motion data will probably cover only a few hours at the most, even for just a couple stations.
  3. ThingSpeak has a rate limit of an update per channel every 15 seconds so more than one station per channel will more than likely run into this limit (even 2 temp stations sending data every 15 minutes can happen to send data less than 15 sec apart); I could wait and retry until the post goes through but this would delay the code and risk missing data sent by the stations. Because of this, I decided to tie the local db data to this service: every time I post to ThingSpeak, I check the response: if > 0, the post was successful, I will log the data to the db with a flag of posted=true (1); if = 0, the post was not successful so I will log the data to the db with a flag of posted=false (0). Later I may create a node-red flow to get all the db data with posted=false and repost it to ThingSpeak; each row records the UTC time of the actual insert so I can send it along with the data, the measurements getting recorded at the actual time they took place not the time I post them.
If you find anything useful in this post and the code I am very happy. Most of this stuff is on the web but putting it together in a real project took some work; I am happy I did it and learned so much in the process. When I started I had no idea how to use a radio on either Arduino or Raspberry Pi, how to work with a PIR sensor and how to use interrupts, how to write any real C code, to work with sqlite and post to REST services on Raspberry Pi and much more. I used a lot of info from the web, from too many people and websites to thank individually but a big thank you! goes to everyone that provided help and information in a way or another.

Thursday, September 04, 2014

SparkFun's Phant.io; libcurl and sqlite on Raspberry Pi

A few months ago SparkFun announced their new data service: phant.io. There are lots of similar services out there, some really awesome, some simple to use others not so much, some with great charting capabilities, others just a data store but I loved Phant from the beginning, mostly because it doesn't try to do a lot but what it does it does great. Also, its simplicity of use is awesome and is open-source. I was writing a JavaScript application at the time that needed a simple backend storage; I could use almost anything for that storage but when I saw the announcement I quickly decided to give it a try and indeed it was a breeze to post and retrieve data.

Fast forward to now: part of a larger project I am writing with a good friend of mine (in a nutshell an Arduino with DHT and PIR sensors gathers data and sends it using a 433 MHz radio to a Raspberry Pi) I wanted to post the data from a Raspberry Pi to some service on the net so again I chose phant.io. There are plenty of great examples on SparkFun's tutorial page (and other resources) about how to use Phant with Arduino, Python, Electric Imp but since the code running on my Raspberry Pi is written in C (because this was the simplest code I found for the 433 MHz receiver) I had to figure out how to use Phant using C. I tried for a couple hours to use sockets (found great code examples) but no matter what I did I was getting stuck in all kinds of issues. While looking around on stackoverflow for a solution I found a mention of libcurl - I don't remember who mentioned it but I owe him/her big thanks. I was a little bit reluctant to try it at first since I knew nothing about it but then another mention showed up so I decided to give it a try.

First thing I tried, adding #include <curl/curl.h> ended up with an error at compile time: file not found. So I had to install libcurl dev libraries which was really easy:

sudo apt-get install libcurl4-openssl-dev

and quickly verified that curl was now present in /usr/include/. Then I got the code from the very first example on libcurl page: simple.c but this time I got another error, curl_easy_init not defined or something like it. Another quick search and figured out I had to link the new library so I modified Makefile and added -lcurl. Now everything built and the first try with my test code posted data to data.sparkfun.com. The code as it stands today is here part of the repository that will eventually contain all the project code.

libcurl is really awesome: it took only minutes of getting the first version of the code done, in just a few lines (compared to 4 times as much for the socket code), the code is much more readable and the docs are awesome. Thanks to all the authors and contributors for such a great library!

Not completely related to the subject, in the same project I wanted to use a local database on the Raspberry Pi; a quick search got me to sqlite which is very easy to install and there are a lot of articles about it. One thing that most authors don't mention is that same with libcurl there is a library that needs to be installed so sqlite can be used in code and also that is has to be linked for the code to compile. Not a big deal but here are the steps in one place:

sudo apt-get install sqlite3 libsqlite3-dev
compiler link argument: -lsqlite3

Friday, June 06, 2014

My first Node-Red node: gcalendar

First thing I found when I was playing with homA was the calendar component that reads an event from a Google calendar - I loved the idea and the implementation. So when I got interested in Node-Red my first thought was: wouldn't it be cool if there was a node like that? I checked the extra nodes repository and couldn't find one so I thought this could be the best opportunity for me to dive deeper into node.js and node-red.

It wasn't all that easy at first since the Node-Red website didn't have any docs at that time about how to write a node - thanks to Nicholas O'Leary a guide is now available, not 100% finished but great enough to help anyone starting on this path. Anyway, looking at existing nodes and experimenting with stuff I was able to do this so here is my first node: gcalendar. While working on this I hit some snags:
  • To get authorized to a Google calendar, OAuth2 must be used. I could have used Alexander's code from the homA calendar component but since I have no experience with OAuth2 I was not confident I can figure it out. Alexander is great and he always helped me when I asked him something but didn't want to take his time with minor things. On the other hand, a while back I heard about Temboo and never tried to use it so this looked like the perfect time to do so. And I'm happy I did: following the steps on the GetNextEvent page
  • I was able in a few minutes to create the app on Google API, get the credentials and get the code to call this Choreo and get the calendar data. There are 2 drawbacks to this approach, none of them a deal breaker for me:
    • there are 3 more properties to set now to configure this node, all related to Temboo - since they don't change in time, this is not a big issue;
    • Temboo only allows 1000 calls per month for free - since I don't plan to call this node more than 10 times a day, this limitation doesn't really affect me; anyway, I like their service a lot and if I'm going to be using them more, I won't mind paying for the next tier service.
  • After the main JavaScript coding was done, I had to figure out the .html file for the node. This was quite challenging without having any docs and it took me a lot of trials to figure out how and what to do; this page was of great help - all of this is now documented on this page which explains everything in great detail.
  • The first version of the node (let's call it v0.1) had all the properties set in the node directly which worked fine but it was a pain to have to re-enter them every time when I created the node during testing; plus, they were saved in the flow JSON which is not a good idea at all. Hardcoding them worked fine for testing but not an option for the final code. So now it was time to figure out the credentials part. First pass was to hardcode them in the settings.js file in Node-Red install dir which worked (this is sort of v1.0 of my node, documented in this file I kept for reference) but not a good idea according to the answers I got to my question. Based on the answers I got from Charalampos and Dave and after a lot more messing with the code, I was able to come up with the current version on my gcalendar node, where credentials are stored in a separate file. There is plenty more I can do to improve this version, but this is the one I use now and I am really happy with it.
In my next post, I will try to show how I use this node in a real flow.

Monday, June 02, 2014

Starting with Node-Red

A couple years ago I started to look into connecting devices to the Internet and played with quite a few services, like Pachube then Cosm now Xively and a few others - this all evolved in what is now named the Internet of Things (IoT) and a lot more services like Xively are now available. These services are usually independent of one another and each has a different way of setting up the communication with the device which makes things a bit difficult for beginners; these devices are sometimes hobby oriented like Arduino or Raspberry Pi but in other case they are products that monitor the home and also take actions (like NinjaBlocks, SmartThings, Insteon, TCP Lighting and so many many more). To make working with these devices easier (detection, customization, adding rules, communication with other services) new frameworks and applications are coming up, like TheThingSystem (TTS - node.js based, v1.8 was just released a couple days ago), OpenHab (Java based), Alexander Rust's homA and others.

A few months back, a new application showed up on my radar: Node-Red; built on node.js, Node-Red is another great product started by IBM researchers. Briefly said, Node-Red provides a browser-based flow editor that makes it easy to wire together flows using a wide variety of nodes presented in the palette; flows can be then deployed to the runtime in the same interface. No point in getting into more details about it, you can read more on the Node-Red website and in various articles like this one.

At that time I was digging a lot into the homA app and its components and I loved it; I was just getting started with the rules engine (which is way cool, by the way); but after discovering Node-Red and after seeing Alexander's comment to this google+ post I realized that I can use Node-Red to simplify the interaction between my devices and the outside world, so I started to research it more. There are great resources around it, the ones I use the most are:
  • Node-Red docs;
  • flows contributed by people working on Node-Red and 3rd parties;
  • Node-Red github repo;
  • other nodes contributed by people working on Node-Red and 3rd parties;
  • the Node-Red google group - Nicholas O'Leary and Dave C-J are awesome, their extremely fast answers helped me a ton.
There are many other interesting resources, like:
I will try to add more resources as I find them. I hope you will like Node-Red as much as I do.

Wednesday, January 22, 2014

Reusing some old microcontrollers Arduino style

The other day I was cleaning up my electronics boxes and I happened on 2 older Atmega32 40 pin controllers I got a long time ago, when first starting my foray into MCUs. I remember those times when I was trying to figure out how to program a controller, when no Arduino was around and everything was done directly in C at pin level, same as I still do now for MSP430; with lots of friends and forum help, I was able to blink an LED even drive an H-Bridge. Cool and also frustrating times! An idea struck me: if people are able to create Arduino like IDEs for all kinds of controllers (see Energia for MSP430 and LaunchPad) maybe it would be possible to program these MCUs the same way: after all, they are Atmel controllers so it shouldn't be that difficult. It all has to start with burning the bootloaded, since this is what makes the Arduino what it is today. It turns out some people figured out how to do this, not very easy but not very complicated either. The post I found most helfpul is here. Thousand thanks to hexskrew for figuring this out!

First thing to do was install Arduino-0022 (I already have 1.0.5 installed but the arduino-extras was written for pre-1.0 versions, didn’t want to go through the pain of updating the code and mess it up for sure) and replace the arduino folder with the content of arduino-extras.zip. Also, in Preferences, I unckecked “Check for updates on startup” because I want to keep this Arduino version as it is - newer versions will apply to my other Arduino-1.0.5 install.

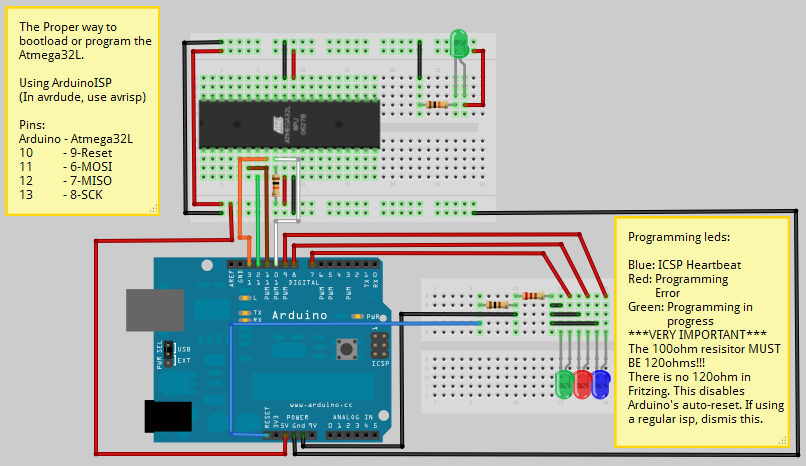
Most important step is wiring the Atmega32 to the Arduino: I have an ISP programmer somewhere but using an Arduino instead seemed to be easier for someone like me. The schematic is shown here and is great!I wired everything as in the image but since I didn't have a 120 ohm resistor, I decided to use a close one instead, 150 ohm. It says clearly in the image that the resistor MUST be 120 ohm but my limited experience said: if 120 ohm can do the job, why not a 150 ohm! Big mistake that cost me quite some time! (Now I know I should listen to my betters and not assume anything, especially since I am just a noob in electronics.) Running the first command in the document:

avrdude -p m32 -c arduino -P /dev/ttyUSB0 -b 19200

I got instead of the expected response:

avrdude: Device signature = 0x1e9502

this:

avrdude: Device signature = 0x1e9406
avrdude: Expected signature for ATMEGA644P is 1E 96 0A
Double check chip, or use -F to override this check.


I googled around and found the same exact message in this post which in turn links to this doc in Arduino playground where it is explained with details that the resistor must indeed be 120 ohm! I dug into my box of resistors in the end found a few that connected together yielded the desired 120 ohm. I reran the previous command again and this time I got the expected reply. Awesome!

Note: there is a difference between the original schematic I followed and the last article I mentioned: in the original one, the 120 ohm resistor is between RESET and GND; in this article is between RESET and 5V. I assume they both worked but I decided to go with RESET to 5V.

The commands are listed and detailed in the post I mentioned above, in a nutshell what I did to burn the bootloader was:
  1. Check everything is ok
  2. Set the chip to be unlocked, and use the internal 8mhz oscillator
  3. Unlock to bootloader
  4. Flash the arduino bootloader
  5. Lock the bootloader.
After this was done, I got the example sketch and tried to compile. I had several errors some that may have been Linux Mint specific (maybe because I already have newer avr libraries installed for Arduino-1.0.5) but this and this posts helped me fix them so in the end the sketch compiled successfully. I uploaded it to the Atmega32 the way it is described in the post - I still need to figure out how to upload it directly without copying it manually from /tmp to /bin. It was getting late when I finished this so I didn't get to test it - I assume I will have to disconnect the SPI communication with the Arduino first. I'll try soon and post back here.

Again, big thanks to hexskrew for figuring this out!

Tuesday, January 21, 2014

Amazing graphs

This post is only indirectly related to Raspberry Pi, Arduino and cloud data because I found out about this great website, plotly by reading this post on Quora: What is a good first project with a raspberry pi?. And while the website itself and the Arduino code look great, I was amazed by the blog content: each graph is not only telling a story but it is really beautiful as well, like this one.

Check them out: http://blog.plot.ly/

Sunday, January 12, 2014

My first smartmaker tiny projects

After more than one year, some of the smartmaker boards made it so I started to play around with them a little bit. First, I have to say that they are pretty cool: it is a lot easier to connect the boards than to put together circuits on breadboard. The docs are still lacking, there are still problems with some boards and I am a bit worried that the connectors may not be quite so resilient in time (for all of these issues and more, visit the smartmaker forums) but overall I like the idea.

First things I tried were pretty simple things (all of these are public projects in my codebender account): changing colors on the RGB led, make 5 leds blinks, read the values of 5 analog buttons and drive 5 leds using 5 analog buttons - the last one was a real hit with my son, he loved pushing one or more buttons to see the corresponding leds turn on.

As a side note, the RGB led board received from smartmaker was not in my original list of boards ordered, as someone mentioned in the forums it seems this was a small gift from smartmaker, so thanks a lot, Dimitri@smartmaker.

The projects I mentioned are nothing special but one thing about them is really cool: think about putting together a circuit with 5 analog buttons and 5 leds; in addition to the buttons and leds, one would need resistors, 10 in this case, wires between the arduino and the breadboard and a lot of patience. It was a breeze to snap a smartcore into an extension board, and the buttons and led boards into another extension board, connected in turn to the first board; seconds really. This is the smartmaker idea that I loved from the start and that I hope will be successful.

A quick photo of the last project I mention is below:

For more info, there are some really nice tutorials posted on the forums by Josephur, specifically here.

Sunday, December 29, 2013

Avahi works great with wifi - finally

One of the first things I do when I setup a new SD card for my Raspberry Pi is to make sure I can connect to it headlessly; this means setting up the SSH daemon to start automatically, configure it to boot to a command prompt (both of these can be done using raspi-config), change the computer name (as described here) and install and configure avahi (as noted on this page). Lately, I also install wifi - in the past, I had some problems doing this but I found that Adafruit's directions work very well, both with my new WiPi and the old wifi dongle I had. Also, on newer Raspbian installs, the gui tool works great - at some point I was even able to launch wpa_gui and configure the wifi in putty using Xming and X11 forwarding.

One thing that bothered me though was that after configuring wifi I was able to connect to my RasPi using raspberrypi.local but only at home; every time I brought my RasPi to work, I had to use the wired connection. I thought the main problem is the avahi configuration that somehow works on 192.168.x.x (at home) but not on 10.x.x.x (at work). I tried so many things without success that I gave up at some point. Until a few days ago when I realized what was happening: at work, the wired and wireless networks are on different IP subnets (if this is the right word - I am no network guru); so, I connected both my laptop and my RasPi to the same wireless network and this time I was able to connect to my Pi using the raspberrypi.local shortcut using only wifi. This was so awesome!

I am pretty sure everyone using a Raspberry Pi knows this by now but for me it was a huge revelation and success so I decided to publish this post, maybe it will help others as well.

Sunday, December 22, 2013

My CheerLight(s) small project

Last Friday I found out about CheerLights powered by ThingSpeak and thought it would be really cool to put my Arduino + Ethernet shield to some use. Looked around for a little bit and found some code here connecting an Arduino to ThingSpeak/Cheerlights channel and driving a GE Color Effect Lights. Modified the code a little bit to drive an RGB led, decorated a tiny tree I had around and here it is my Christmas project alive.

The latest code is on codebender and below are some photos. I know the code can be much nicer but it works pretty well so I will leave it as it is. While working on it I ran into some weird behavior: a lot of failures when connecting to ThingSpeak and other strange stuff - it turns out the problem was with the response variable getting too big so I am resetting it now after getting the status (at least I think this was the reason because it works now after making the changes when reading the response).

Enjoy!